 Sensor
Holders Sensor
Holders
By
Craig Reinbrecht

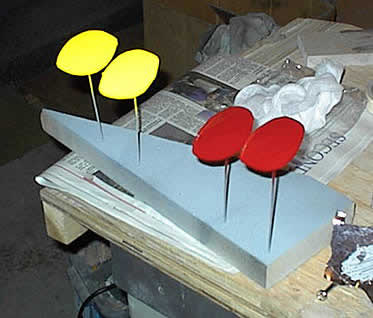
The first pair of sensors/holders I made, I presented to Bob May
for his fan-built robot at Fright Vision 2000.

A year later I finally made a second pair for my robot! I made this
set to fit onto my tiny MicroMo motors and this is how they were
made.
Materials Needed: Clean (unused) one quart paint can, epoxy,
epoxy putty, 1/4" brass rod, and two 4-40 round head slotted
screws (3/16" long)
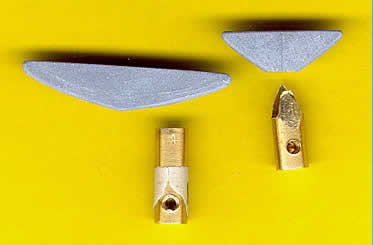
To make The Sensors:
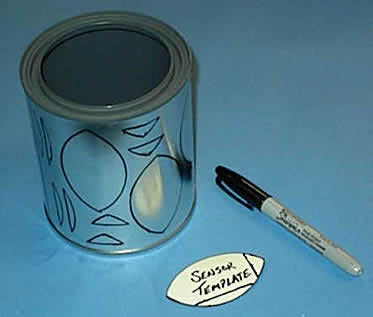
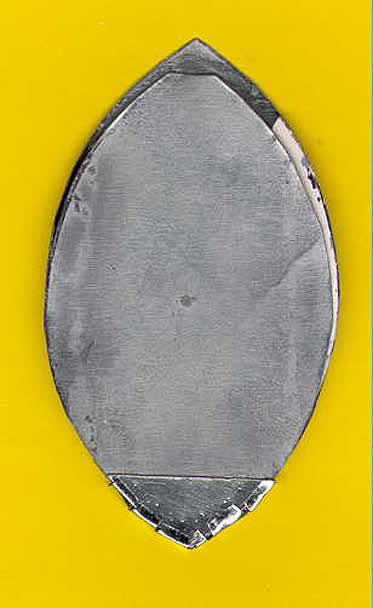
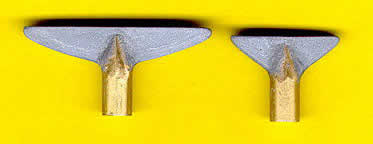
To make my sensors I used a one quart paint can that I purchased
new at a paint store for about $1.50. I studied pictures of the
originals to verify that the 2" radius of the paint can looks
just right when the sensor is finished. Print (at 150dpi) and cut
out the sensor template which is 2.75" by 1.625" and trace
it onto the can with a Sharpie marker.

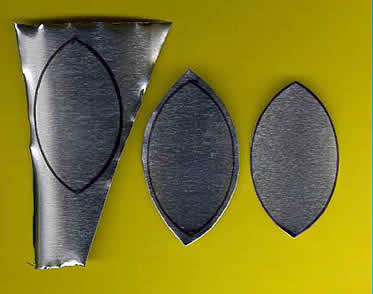
I found the sheet metal in the cans was so thin it could be cut
with scissors, so rough cut the sensors first leaving an extra 1/8"
all the way around, then cut them close to the final size. That
little trick keeps the thin metal from creasing while you cut it.
(TIP: Don't use your wife's good sewing shears!)
Because the metal is so thin and flimsy, I used epoxy to glue two
pieces together. The resulting epoxy sandwich came out very ridged
and strong, yet still fairly thin.
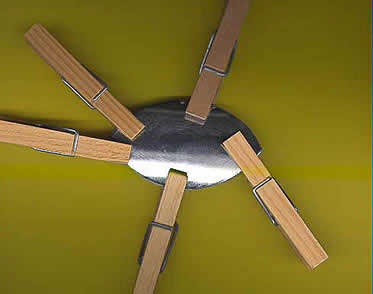
I carefully cleaned up the edges on my sanding disk to get the shape
perfect. Next, sand the shiny surfaces and the edges by hand with
some 220 grit sandpaper to prepare them for primer. You might want
to make a simple painting stand with some coat-hanger wire and a
little bit of masking tape to make the painting process easier.
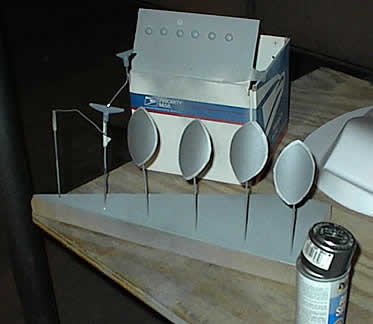
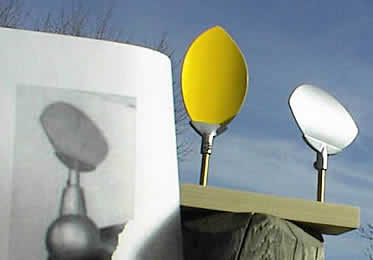
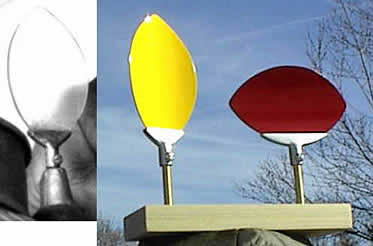
I sanded and primed the sensors a couple times to get a good base
ready for the paint. Make sure there is no metal exposed. To paint
the sensors to the second/third season paint scheme of red and yellow
with silver on back, it is a good idea to get some "safe-release"
masking tape (available in the paint section of any home store).
This doesn't stick as ferociously as standard masking tape, so it
won't peel up your carefully painted surfaces. While painting the
backs silver, cover the fronts with the safe-release masking tape
and visa versa. The red, yellow, and silver paints will over spray
onto the opposite surface without it.
Done with the sensors!
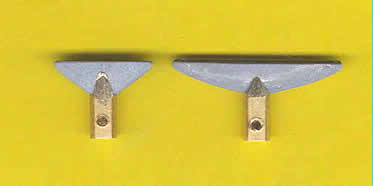
To make the Holders:
The holders are made from plumbers epoxy and some 1/4" round
brass rod. Plumbers Epoxy is a great substance that I used in many
parts of my robot and is great for attaching screws to the inside
of the torso. It can be found in the plumbing section of Home Depot
right by the solder.
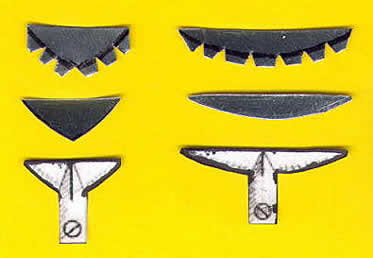
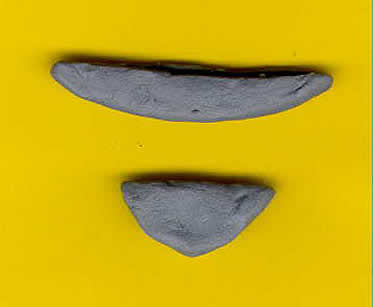
To make the holders, I first took scrap sensors (cut out of the
one quartpaint can) and stacked 3 together so the stack was a little
thicker than a finished sensor. Then I cut very small pieces of
the leftover thin sheet metal from the can to wrap around the tip
of the sensor emulating the holder and about that size.
This is an important step, and it pays to do this part carefully.
I actually made a back piece with tabs, that raps around over the
front piece, and made this form very tight to the scrap sensors.
Small side cutting wire cutters (snips) work good to cut the little
pieces.
Next, carefully scuff up the shinny metal with some sand paper,
so theepoxy putty has something to bite into. Cover the small sheet
metal"holder" with epoxy putty so there is a nice thick
layer of putty, but becareful to keep it off the scrap sensors!
After about twelve hours theplumbers epoxy is thoroughly dry and
hard as a rock. This stuff is very strong and bonds well.
I carefully pull out the scrap sensors so a very nice form fitting
slit is left in the top of the holder. Now you have to file or sand
the holder very carefully to the correct shape using the best photo's
as a guide.
To make the round shaft I used 1/4" solid brass rod that you
can get at a home store or hobby store. Cut it close to length,
about 11/16". To make the sensors to fit onto the MicroMo motor
shaft, or any other motor shaft, you will need to drill a hole in
the bottom of the rod to match the size of the motor shaft. First,
make a simple jig to hold the rod so it can be held securely so
perfectly straight holes can be easily drilled using a drill press
(If you don't have a drill press, you can use a thick walled 1/4"
aluminum tube instead of the solid brass rod). To make the holding
jig use a scrap piece of wood at least 3/4" thick and drill
two 1/4" holes about 1/2" deep. Put the two brass rod
pieces into the holes. Now you can safely and easily drill the holes
in the bottoms of the rod being careful to get the holes perfectly
centered. I believe a 1/16" hole (my smallest drill bit) was
perfect for the MicroMo motor shaft. After you drill the hole for
the motor shaft, you must drill the hole for the 4-40 round slot
head screw that will go in the side of the shaft. This will make
the holder look authentic, plus it can actually work to hold the
sensor onto the shaft. Drill the screw hole more than half way through,
but be careful not to drill all the way through! The hole for the
screw must be tapped and I had to buy three 4-40 taps to accomplish
it. The first tap was used to get the threads started, then break
a little off of the tip of the second to go a little deeper, then
a little more off the third to get the threads cut all the way into
the center of the rod. Make sure to use some oil or tapping fluid
to make this MUCH easier.
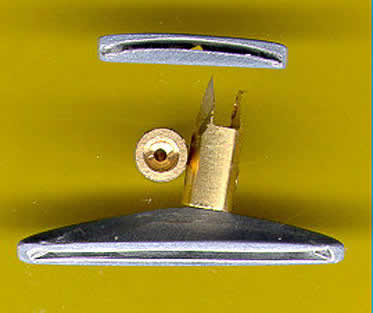
Next, securing the little brass rod piece in a vise (with wood to
protect the rod) cut a slit in the top of the rod that the holder
part can fit into. I used a hacksaw and a small file. Carefully
file the outside sides of the slit as you see in the pictures to
match the original look.Now it is time to attach the holder to the
rod using a very small amount of epoxy putty.
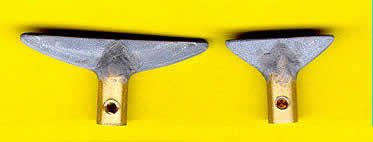
When that is thoroughly dry, do some final sanding to get a smooth
uni-body look, then prime and paint!
A very tiny dab of epoxy will hold the sensor in the holder, and
you are done!
|